Quickstart Guide
This quickstart guide walks you through essential operations with the N-central API, following a typical lifecycle of setting up and managing your environment. You'll learn how to authenticate, create a service organization, add customers and sites, and manage devices and users.
Before You Start
Before making API calls, ensure you have:
- An N-central instance (version 2023.9 or later)
- User account with appropriate permissions. Visit Create an API-only userCreate an API-only user for more information.
- Access to generate a JWT token from the N-central UI
- Tools for testing:
- Postman or similar API testing tool
- API Reference documentation
- Basic understanding of REST APIs
NoteRemember to replace
YOUR_JWT_TOKENandYOUR_ACCESS_TOKENwith your actual tokens in these examples. The JWT token is used only for initial authentication, while the access token is used for all subsequent requests.
Swagger UI
Each N-central has an embedded Swagger UI, listing all available endpoints and allowing interaction with them.
To get to the Swagger UI, simply append /api-explorer to the FQDN of your N-central. Example: https://nfr.n-able.com/api-explorer
API Reference
The API Reference allows interacting with your N-central from this documentation directly.
Visit the page. Populate the custom server section
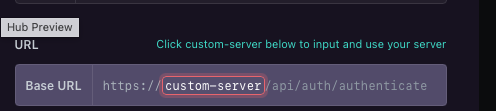
Add your Token

and try the APIs!
Step 1: Authenticate and Get Access Token
The first step is to authenticate with the N-central API and obtain an access token. This token will be used for all subsequent API calls.
Example Request
curl --request POST \
     --url https://your-server/api/auth/authenticate \
     --header 'Authorization: Bearer YOUR_JWT_TOKEN'
Example Response
{
    "tokens": {
        "access": {
            "token": "eyJhbGciOiJIUzI1...",
            "type": "Bearer",
            "expirySeconds": 3600
        },
        "refresh": {
            "token": "eyJhbGciOiJIUzI1...",
            "type": "Body",
            "expirySeconds": 90000
        }
    },
    "refresh": "/api/auth/refresh",
    "validate": "/api/auth/validate"
}
Key Response Details
access.token: Use this token for subsequent API callsrefresh.token: Use this to obtain a new access token when it expiresexpirySeconds: Shows how long the tokens are valid
Step 2: Create a Service Organization
After authentication, create a service organization to establish your organizational structure.
Example Request
curl --request POST \
     --url https://your-server/api/service-orgs \
     --header 'Authorization: Bearer YOUR_ACCESS_TOKEN' \
     --header 'Content-Type: application/json' \
     --data '{
       "soName": "Enterprise IT Services",
       "contactFirstName": "John",
       "contactLastName": "Smith",
       "contactEmail": "[email protected]",
       "phone": "555-0100",
       "country": "US"
     }'
Example Response
{
    "soId": 12345,
    "data": {
        "soName": "Enterprise IT Services",
        "contactFirstName": "John",
        "contactLastName": "Smith",
        "contactEmail": "[email protected]"
    }
}
Key Response Details
soId: The unique identifier for your new service organization- Save this ID for use in subsequent operations
Step 3: Add a Customer
Once you have a service organization, you can add customers under it.
Example Request
curl --request POST \
     --url https://your-server/api/service-orgs/12345/customers \
     --header 'Authorization: Bearer YOUR_ACCESS_TOKEN' \
     --header 'Content-Type: application/json' \
     --data '{
       "customerName": "Acme Corporation",
       "contactFirstName": "Jane",
       "contactLastName": "Doe",
       "contactEmail": "[email protected]",
       "licenseType": "Professional"
     }'
Example Response
{
    "customerId": 67890,
    "customerName": "Acme Corporation",
    "orgUnitType": "CUSTOMER",
    "parentId": "12345"
}
Key Response Details
customerId: Unique identifier for the new customerparentId: References the service organization ID
Step 4: Create a Site
Add a site under your customer to organize devices and services.
Example Request
curl --request POST \
     --url https://your-server/api/customers/67890/sites \
     --header 'Authorization: Bearer YOUR_ACCESS_TOKEN' \
     --header 'Content-Type: application/json' \
     --data '{
       "siteName": "Acme HQ",
       "contactFirstName": "Robert",
       "contactLastName": "Johnson",
       "street1": "123 Business Ave",
       "city": "Chicago",
       "stateProv": "IL",
       "country": "US",
       "postalCode": "60601"
     }'
Example Response
{
    "siteId": 11111,
    "siteName": "Acme HQ",
    "orgUnitType": "SITE",
    "parentId": "67890"
}
Key Response Details
siteId: Unique identifier for the new siteparentId: References the customer ID
Step 5: List and Monitor Devices
After setting up your organizational structure, you can list and monitor devices.
Example Request
curl --request GET \
     --url 'https://your-server/api/devices?pageSize=50&pageNumber=1' \
     --header 'Authorization: Bearer YOUR_ACCESS_TOKEN'
Example Response
{
    "data": [
        {
            "deviceId": 22222,
            "longName": "ACME-WKS-001",
            "deviceClass": "Workstations - Windows",
            "orgUnitId": 11111,
            "customerId": 67890,
            "siteId": 11111
        }
    ],
    "pageNumber": 1,
    "pageSize": 50,
    "totalItems": 1
}
Key Response Details
deviceId: Unique identifier for each devicedeviceClass: Type/category of the device- Organization hierarchy references (
orgUnitId,customerId,siteId)
Handling API Responses
When working with the N-central API:
Status Codes
- 200: Successful operation
- 400: Invalid request format or parameters
- 401: Authentication failure
- 403: Insufficient permissions
- 404: Resource not found
- 429: Too many requests (rate limiting)
- 500: Internal server error
Best Practices
-
Authentication
- Store tokens securely
- Implement token refresh logic
- Handle token expiration gracefully
-
Rate Limiting
- Implement exponential backoff
- Handle 429 responses appropriately
- Space out bulk operations
-
Error Handling
- Log detailed error information
- Implement retry logic for transient errors
- Provide meaningful error messages to users
-
Pagination
- Use page parameters for large data sets
- Implement proper page iteration
- Handle partial results appropriately
Next Steps
After completing these basic operations, you can:
- Configure custom properties for devices and organizations
- Set up user roles and access groups
- Create and manage scheduled tasks
- Monitor active issues
- Configure maintenance windows
Refer to the complete API reference documentation for detailed information about all available endpoints and operations.